Henry Archer helped change the way British stamps were separated. His trials began with small cuts in the paper and developed into a system that punched rows of holes between the stamps. Turning that idea into dependable machinery took years of experiments and improvements before perforated postage stamps entered regular production in 1854.
This guide concentrates on British Victorian stamps perforated at Somerset House, particularly Penny Reds and Twopenny Blues. The basic principles are useful more widely, but the working practices and varieties described here should not be assumed to apply to every country's stamps.
Archer’s trials and the beginnings of perforation
As stamp use grew, cutting each stamp from a sheet became an inconvenient extra task. Perforation offered a repeatable way to prepare sheets for quick separation, but building a machine that could do it accurately was much harder than making a few holes by hand.
Henry Archer was a central figure in the British development. He experimented with rouletting around 1847, then turned to punched holes. By late 1848 his perforating machine was being brought to the authorities' attention. Trials and engineering changes followed. The achievement was the practical application of perforation to sheets of stamps; it would be misleading to describe Archer as the inventor of every form of perforation.
Following an agreement with Archer in 1853, the government adopted the process. The machines used for regular production were built by David Napier & Son. Officially perforated revenue stamps appeared in October 1853, followed by postage stamps early in 1854. The Napier machines developed the idea into a more suitable production system.
For the Penny Red, printing and perforating were separate operations. Perkins, Bacon supplied printed sheets; the perforating work took place at Somerset House. A flaw in the printed design and an error in the holes around it therefore belong to different stages of manufacture.
Start with what has happened to the paper
Early British postage stamps were supplied without rows of holes between them. These imperforate stamps had to be separated with scissors or a knife. Uneven margins on an early stamp can therefore reflect the way it was cut from its sheet.
Rouletting made separation easier by putting a series of small cuts through the paper. It did not remove little discs of paper. Perforation did: punches removed a row of small circles, leaving narrow bridges between the holes. When the stamps were pulled apart, those bridges broke and became the familiar paper teeth.
This distinction matters when describing a find. A ragged or saw-like edge is not automatically a roulette. Overlapping rows of punched holes can produce a similar appearance.

What was inside a perforating machine?
Think of a carefully controlled press working on a batch of sheets. It had to punch clean holes, release the paper without tearing it, and move the sheets exactly far enough for the next stroke.
- Punches or pins
- Small steel cylinders that cut the holes. Their ends were flat with cutting edges, rather than sewing-needle points.
- Pin plate
- The plate holding the punches in their required pattern. A damaged pin could leave its place in that pattern uncut.
- Die plate
- A matching plate below the paper, with receiving holes for the punches. Accurate alignment between the two was essential.
- Stripping plate
- A perforated guide that supported the pins and held the sheets while the punches withdrew. It helped stop the paper lifting with them.
- Sheet carrier
- A tympan held the sheets, used with a retaining frame or frisket. A sliding carriage moved them through the machine.
- Feed and adjustment
- The mechanism that moved the sheets between strokes. Later developments used grippers and improved feeding arrangements.

The Somerset House production machines were designed for steam power, transmitted through shafts and belts. A flywheel also allowed manual operation. Sheets were commonly worked in small batches, often five at a time. The operator could see the top sheet, but not necessarily a misalignment in one underneath.
Archer’s machine: carrying the sheets through the punches
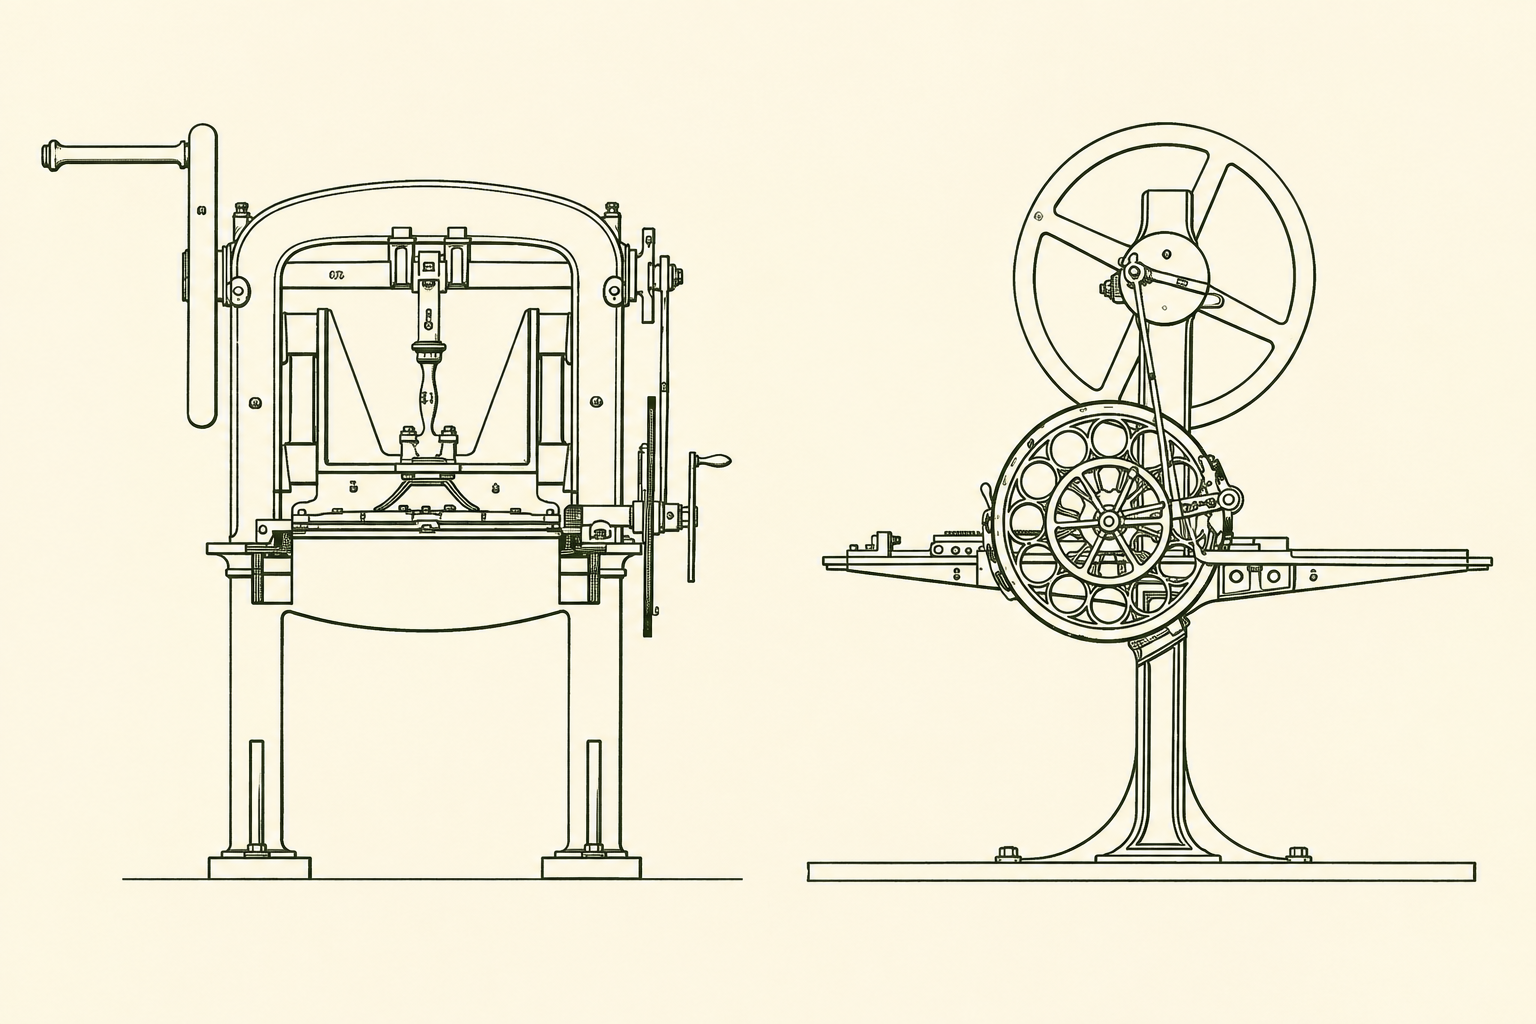
Archer’s machine linked the punching stroke to a sliding sheet carrier. A rotating shaft and eccentric drove the plunger, while a rack-and-pinion mechanism advanced the carrier between strokes. Its double-width comb worked across two batches placed side by side. The early carrier used clips, with a tympan and frisket arrangement adopted during development.
Napier’s machine: the later gripper-fed arrangement
Napier’s 1877 design used grippers to advance the sheets in stages. A relieving plate held the paper during punching and withdrawal of the pins; the grippers released and returned to take another hold. The registering arrangement positioned a fresh batch, with its register points withdrawing to let the paper travel.
Why collectors talk about a “comb”
With line perforation, the horizontal and vertical lines are made separately. A simple single-line punch machine makes one straight line per stroke: the operator advances the sheet to make parallel lines, then turns it through 90° and repeats the process in the other direction. Other machines use separate perforating units for the two directions, so turning the sheet is not a requirement of every system.
Because the crossing lines are made independently, their holes may not meet neatly at the stamp corners. A comb perforator, by comparison, has a long row of punches with shorter rows projecting from it. In a normal top-first feed, its first stroke perforates the top and both sides of a row of stamps together.
The sheets then advance by one stamp row. The next stroke supplies the bottom edge of the first row while making the top and sides of the next. This repeated movement is the key to understanding many of the errors found on Penny Reds.
A harrow perforator uses a complete grid to perforate a whole sheet in one operation. It is useful to know the term, but the Archer and Napier machines discussed here used the comb principle.

What does “perforation 14” mean?
The perforation gauge describes the spacing of the holes: it is the number of holes in a distance of 2 centimetres. It is not the total number along a particular stamp edge. Gauge 16 has more closely spaced holes than gauge 14.
Use a perforation gauge to match a run of holes, checking horizontal and vertical edges separately. A compound measurement such as 15½ × 15 gives the horizontal gauge first and the vertical gauge second. Keep the stamp flat and avoid forcing a match from just two or three holes.

The first regular perforated Penny Reds used gauge 16. Gauge 14 began replacing it in 1855, following difficulties that included fragile sheets and problems with the punch sets. The change was gradual, so gauge 16 did not disappear overnight. A gauge identifies an issue or production characteristic; an ordinary example of a particular gauge is not, by that fact alone, a perforation error.
Why did the holes sometimes miss their intended position?
A rigid punching pattern had to fit sheets that were not perfectly uniform. The spacing of the printed impressions could vary, and wetting and drying during production could change the paper's dimensions unevenly. Positioning the sheets and keeping a batch aligned added further difficulties.
Consequently, a stamp can be off-centre even though the machine's punches are correctly arranged. Slightly uneven centring is common on these issues. A much more pronounced displacement, particularly one crossing the printed design, may be worth studying as a production variety. The degree and character of the displacement matter.
The errors that make an interesting collection
There are two useful questions to ask: did something happen to this sheet or batch, or did a fault in the punch set repeat? The first leads to irregular and misplaced perforations; the second leads to the study of broken pins. Collectible does not automatically mean rare or valuable.
Misplaced, long and short perforations
If the first stroke landed in the wrong place and the sheets were repositioned before the next, the distance between the horizontal lines could become unusually large or small. The result is a long or short stamp. Such examples are particularly associated with the first row perforated.
A long stamp may have a small unperforated length near one end of a side. That alone does not prove a missing pin. Compare the dimensions and the complete pattern of holes with a normal stamp of the same issue. A pair or block often makes the adjustment much easier to understand.
Double and multiple perforations
Two strokes affecting the same area can leave two distinct lines of holes. If the lines overlap closely, they may instead produce elongated holes or a saw-like edge. Extra perforations can run through the design as well as beside it.
These are appealing because the additional pattern is often visible without elaborate equipment. Look for a coherent second line rather than a few irregular tears. Sheets could also be put through the machine again to salvage imperfect work; a second pass need not fit neatly over the first.
Missing lines and imperforate areas
A sheet could escape perforation altogether, or an adjustment could leave part of it unperforated. This produces fully imperforate errors, missing rows, or partially imperforate stamps on issues that should normally have holes.
An attached pair or block showing an uncut gap between designs is much stronger evidence than a single stamp with smooth edges. A single can have had its perforations trimmed away. Do not confuse a normal early imperforate issue with an imperforate error of a later, normally perforated issue.
Folds and distorted perforations
Paper that was folded or bowed beneath the punches could open out with an unexpected pattern of holes. Diagonal lines, abrupt changes of direction, and unusual widths or shapes can provide evidence of what happened to the sheet.
Here the shape of the error is part of its interest. Preserve a surviving block or margin: the neighbouring stamps and any crease may explain more than an isolated example. Some unusual patterns allow several possible explanations, so a precise mechanical story should not be invented from a single stamp.
Ghost and incomplete perforations
Sometimes the punches marked the paper without cutting cleanly through it. Ghost perforations can preserve a recognisable pattern of shallow impressions. Elsewhere, a disc of paper may remain partly attached, making a hole appear absent.
These effects record imperfect punching, but they are not all the same thing as a broken pin. Inadequate penetration can explain ghost impressions; worn cutting surfaces and obstructed die holes can also contribute to rough or incomplete work. Ordinary rough perforations are much less distinctive than a clear, coherent error.

The repeating clue: broken perforation pins
If a punch broke, it could fail to remove its normal circle of paper. The result might be a solid bridge between adjacent holes, where a hole would normally be. This appearance is only a starting point: a retained paper disc or an incompletely cut hole can look similar.
Because the same comb struck repeatedly, a damaged punch could reproduce its defect as the sheets advanced. That makes a genuine broken-pin variety constant for the period in which that damaged punch set was used. It is not a permanent feature of the printing plate.
A defective punch set could perforate sheets printed from several different plates. Conversely, not every stamp from one printing plate will show the fault. For identification, the stamp's issue, gauge, corner letters, affected edge and exact position of the gap need to agree with the reference description.
There is an important qualification: a pin that has lost only its tip can still leave an indentation or a partial cut. “There is a mark, so the pin cannot have broken” is therefore too absolute. Confirmation comes from the whole pattern and comparison with recorded examples.
Turning a sheet before perforation could change where a fault appears relative to the printed design. Specialist references account for these feed directions. Do not force an unmatched example into a listing just because one gap looks similar.
A practical routine for a new find
- Identify the stamp first. Establish the issue and measure the gauge before deciding what is abnormal.
- Compare it with a normal example. Check size, centring and the full run of holes, not just the conspicuous edge.
- Look from both sides. Magnification and light from an angle can reveal a retained disc, shallow indentation, crease or tear. Keep the paper undisturbed.
- Keep the evidence together. Pairs, blocks, sheet margins and covers can establish relationships that a loose single cannot.
- Record what you can see. Note the gauge, letters, plate if established, affected edge and photographs. Separate the observation from your suggested explanation.
- Check the specialist listing. For a broken pin, use its counting convention and diagrams. Seek an experienced opinion before treating an uncertain example as a scarce variety.
Torn or shortened teeth, scissor-cut edges and later alterations can imitate production faults. Extra holes have also been added to “improve” stamps or change the apparent state of a variety. Leave suspicious edges as found; removing a paper disc or adding a hole can destroy the evidence.